Home / MPC4000 OS / User guide
MPC4000 OS 1.81 user guide
CHOP, Non-Destructive Slice, faster program editing and Monitor DIRECT. This guide covers what the firmware adds, not every function of the original MPC4000 OS.
Before you start
You install and use this firmware entirely at your own risk. OS 1.81 is a beta version of an unofficial modification, not an Akai release. By flashing it you take full responsibility for the result — I can't be held liable for any damage, lost data or a non-working MPC4000.
An update can fail because of a poor-quality USB cable, an interrupted connection, a power loss or sleep during flashing, or an incompletely downloaded file. Keep the MPC4000 powered on and connected until flashing finishes, and check that the file is exactly 4,194,304 bytes.
Back up all your projects before you update. Copy projects, programs and samples to a separate drive or computer and keep that copy untouched.
Don't work on old projects in OS 1.81. Opening and re-saving projects made on another OS version can damage them. Start new projects in 1.81, and keep your old ones on the OS they were made with.
CHOP: turn a performance into Regions
SAMPLE › REGION
CHOP lets you create Region boundaries by tapping pads during sample playback, or split and merge Regions precisely with ADD and DEL. It changes the sample's Region map, not the underlying audio.
Enable CHOP
- Select the sample and open SAMPLE › REGION. If you want to chop from scratch, begin with one Region covering the desired sample area. Enabling CHOP does not erase existing Regions.
- Hold SHIFT. The alternate footer shows CHOP:OFF, CHOP TO, ADD and DEL.
- Press F1 to select CHOP:ON, then release SHIFT. The CHOP controls remain visible while the mode is on.
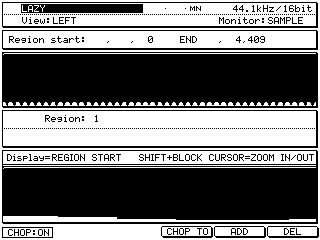
Create markers with the pads
- With a single full-length Region, press PAD A1 to start its playback from the beginning.
- As the next sound begins, press PAD A2. Because Region 2 does not yet exist, the press creates its start marker at the current playback position. Region 1 ends immediately before it.
- Continue with PAD A3, PAD A4 and so on. Use the next unassigned Region pad for each new cut.
- Press an already assigned pad to select and restart that Region. This is an audition, not another cut. Repeated presses restart the preview instead of layering it.
Select, then fine-tune. An assigned pad also selects its Region on the display and updates the waveform selection. Leave the cursor on Region START or END, select another Region with its pad, and use the data wheel to adjust that Region without moving the cursor back to the Region-number field.
Pad-to-Region mapping
| Bank | First pad | Last pad |
|---|---|---|
| A | A1 = Region 1 | A16 = Region 16 |
| B | B1 = Region 17 | B16 = Region 32 |
| C | C1 = Region 33 | C16 = Region 48 |
| D | D1 = Region 49 | D16 = Region 64 |
| E | E1 = Region 65 | E16 = Region 80 |
| F | F1 = Region 81 | F16 = Region 96 |
After a successful new cut on A16, B16, C16, D16 or E16, CHOP automatically selects the next bank, so you can continue on its first pad. Auditioning an existing 16th Region does not switch banks. Bank F is the last bank and does not wrap back to A.
ADD: split at a precise sample position
Use ADD when you know the exact cut position or want to refine a chop numerically.
- Select the Region you want to divide.
- Move the cursor to Region END and set it to the position where the new Region should begin.
- Press F5 ADD. The new Region is inserted immediately after the selected one; later Regions are renumbered.
Worked example · ADD
Original Region 1: START 0, END 20,346. Set Region END to 10,000, then press ADD.
0 – 9,999Region 2
10,000 – 20,346
The new Region keeps the original tail. END values are inclusive: the first Region ends one sample before the new Region starts.
DEL: merge with the previous Region
- Select the Region you want to remove from the Region map.
- Press F6 DEL. Its range is merged into the preceding Region, and later Regions move down by one number.
Worked example · DEL
Using the two Regions above, select Region 2 and press DEL.
0 – 20,346
Region 1 cannot be deleted this way because there is no preceding Region. DEL removes a boundary, not the audio inside the Region.
CHOP TO: Threshold
For automatic marker placement, press F4 CHOP TO in the CHOP footer, or hold SHIFT and press F4 on the REGION page.
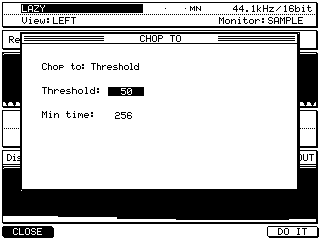
| Setting | What it does |
|---|---|
| Threshold: 0–100 | Attack-detection sensitivity. Higher values generally find more attacks, including weaker ones. Lower values favor stronger attacks. |
| Min time: 0–1000 | Minimum spacing between detected attacks in PCM samples per channel, not milliseconds. At 44.1 kHz, 1000 samples are about 22.68 ms. |
| F1 / CLOSE | Close without applying a new Region map. |
| F6 / DO IT | Analyze the selected sample area and replace the current Region map. The progress display appears during analysis; audio data stays unchanged. |
Up to 96 Regions can be created. The first and last Regions cover the outer analysis boundaries. Stereo channels use the same marker positions. If a boundary is not where you want it, select that Region and refine START/END manually.
Leave CHOP
Press F1 to select CHOP:OFF and release SHIFT to restore the standard footer. Leaving SAMPLE › REGION also switches CHOP off automatically. The Region markers you made remain.
While CHOP is on, pads preview the current sample's Regions. They do not trigger their MAIN-program assignments at the same time. The sequence can keep playing. Leaving REGION restores the pads' normal routing.
Non-Destructive Slice
SAMPLE › REGION › EDIT › SLICE SAMPLE
Non-Destructive Slice (NDS) creates a program whose pads play Regions of the original sample. It does not render a separate audio fragment for every pad. You can return to the source sample and change a Region's boundaries later.
Create an NDS program
- Prepare the source sample's Regions manually, with pad chopping, or with CHOP TO.
- If CHOP is on, switch it off and release SHIFT so the standard footer returns. Press F5 EDIT.
- Choose SLICE SAMPLE in the Edit field.
- Set Generate sequence: NO for a program-only workflow, Create new program: YES and Non-Destructive: YES.
- Press F6 DO IT. Select the new program in PROGRAM or assign it to the desired Multi part, then play the Region pads.
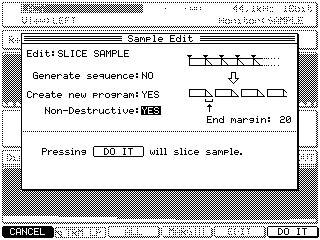
Non-Destructive: YES
One source sample, several Region references. Pad playback follows the linked Region boundaries. No separate PCM slice is created for each pad.
Non-Destructive: NO
The normal SLICE SAMPLE workflow produces separate sliced samples. Later changes to the original Region map do not update those slices.
Refine the chops after making the program
Open the original source in SAMPLE › REGION. Select a Region and adjust START or END. The linked NDS pad uses that Region, so there is no need to run SLICE SAMPLE again for every boundary correction.
With CHOP enabled, ADD and DEL also update the linked NDS Region assignments. For a regular, non-NDS program, the Region map alone does not rebuild the program: run SLICE SAMPLE to create new sliced assignments.
The Region map belongs to the source sample. NDS programs linked to the same source share its Region boundaries. Copying a program is not the same as copying its source audio; use an independent source if you need an independent chop map.
Playback still uses the PROGRAM settings
NDS is not a forced one-shot mode. PROGRAM › ZONE › Play mode still controls playback:
- ONE SHOT — plays the Region without requiring the pad to stay held.
- NO LOOP — gated, non-looping playback with the normal envelope and note-release behavior.
- LOOP — uses the Region boundaries for looping, with the normal gated/envelope behavior.
- AS SAMPLE — follows the source sample's play mode. If the source itself is one-shot, AS SAMPLE stays one-shot; it does not force a hold-to-play mode.
Save the source together with the program
At STOP, save the program WITH SAMPLES, or save the project with its programs and samples. Keep the AKP and the original source WAV together: the program links and the source Region metadata are both needed to rebuild the NDS mapping.
If you changed markers and a WAV with the same name already exists, save the updated source too — skipping its replacement can leave old marker data on disk. Keep a separate backup before overwriting an earlier version, and reload on OS 1.81.
Edit: ONE / ALL / ADD
PROGRAM › KG MIX / PITCH / EDIT 1 / EDIT 2 / ZONE
The SHIFT + F6 shortcut exposes the MPC4000's existing shared Edit setting directly on all five pages. You no longer need to move to EDIT 1, EDIT 2 or ZONE just to change the edit scope.
- Open one of the supported PROGRAM pages.
- Hold SHIFT. The rightmost button becomes Edit:ONE, Edit:ALL or Edit:ADD.
- Press F6 to cycle to the mode you need. Each press advances once.
- Release SHIFT and edit the parameter as usual. The cursor stays in place and the chosen Edit mode remains active.
ONE: edit one keygroup or note
Only the selected keygroup/note is affected. Use this for tuning, level, filter or zone adjustments on a single pad.
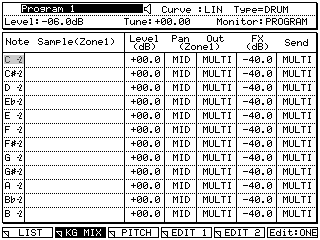
ALL: set the same absolute value
Edits apply the same absolute value across the program's keygroups/notes. Use this when you want a common starting point, such as the same tuning or envelope setting.
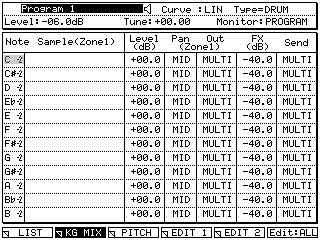
ADD: apply the same relative change
Edits adjust keygroups/notes relative to their current values, keeping the differences between them where the parameter supports relative editing. Useful for an overall boost, cut or tuning shift after individual adjustments.
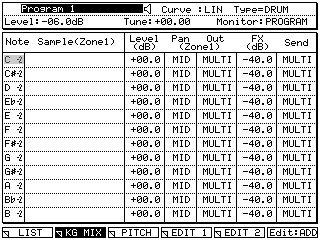
Worked example · relative tuning
Two notes are tuned to +0 and +2 semitones. A +1 semitone change in ADD makes them +1 and +3. Setting an absolute tuning of +1 in ALL makes both +1.
Two different ADD controls. CHOP's ADD inserts a Region boundary. PROGRAM's Edit:ADD selects relative editing; it does not add Regions, samples, pads or keygroups. Just cycling the mode does not change any values.
The setting is shared across the supported pages, not stored separately for KG MIX and PITCH. Switch back to ONE before a change meant for only one note. These are program-parameter edits, not destructive edits to the sample's audio.
ONE / ALL / ADD keep the original Akai editing semantics — see the Akai MPC4000 User Guide, printed page 86.
Monitor: DIRECT
RECORD › Monitor: DIRECT
DIRECT keeps the selected external input audible when you leave RECORD and work in MAIN or other menus. Use it to listen to an instrument, a turntable preamp, a mixer or another line-level source while operating the MPC.
OFF, ON and DIRECT
| Monitor | Behavior |
|---|---|
| OFF | Input monitoring is muted. This is a monitoring setting, not a command to start or stop recording. |
| ON | The input is monitored while you are in RECORD. It stops when you leave that page. |
| DIRECT | The input is monitored in RECORD and stays audible after you switch to another menu. |
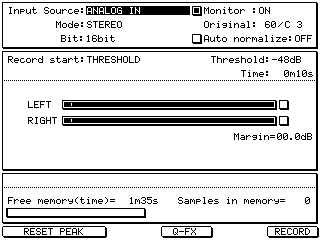
Enable continuous input monitoring
- Turn down headphone and monitor-speaker volume. Connect the external source to the intended MPC input.
- Open RECORD. Set Input Source to the connected input (ANALOG IN in these examples). Check that the input is present before leaving RECORD.
- Choose Mode and Bit as needed: STEREO for a stereo source, or the matching mono-input mode for a single channel.
- Move the cursor to the Monitor field and turn the data wheel from ON to DIRECT. The checkbox is checked for both ON and DIRECT; there is no separate DIRECT switch.
- Press MAIN or open another menu. The input should stay audible without pressing a pad or starting a recording.
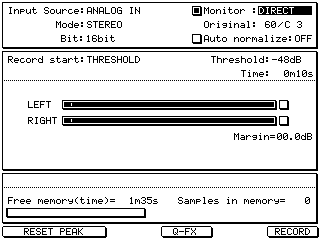
DIRECT does not record the input by itself. It keeps monitoring active while you navigate. Start and stop an actual recording with the normal RECORD controls. DIRECT means persistent input monitoring, not a zero-latency analog bypass.
Which settings are used?
| Control | Effect on DIRECT |
|---|---|
| Input Source | Chooses the external input that is monitored. Return to RECORD to change it. MAIN OUT and CD are not supported as DIRECT sources; digital/ADAT choices depend on the installed hardware and clock setup. |
| Mode | Keeps the selected stereo or mono-input configuration outside RECORD. Choose it before checking left/right behavior. |
| Bit | Keeps the selected 16-bit or 24-bit input format for the monitoring path. After boot RECORD starts at 16 bit; a later explicit choice is not reset on every visit. |
| GLOBAL › Master level | Controls the monitored input's level outside RECORD as well as inside it. No need to retrigger a pad after changing it. |
Use the RECORD Q-FX processing
- In RECORD, press F4 Q-FX.
- Choose the Q-FX processing mode and settings, including the input Send where applicable. Check the sound while you are still in RECORD.
- Keep Monitor: DIRECT selected and leave RECORD. The DIRECT input keeps the RECORD Q-FX processing instead of switching to a dry path.
To change the processing, return to RECORD and adjust Q-FX there. Q-FX OFF gives the unprocessed input.
Program/project FX limitation. DIRECT does not support the normal shared program/project effect returns at the same time. RECORD Q-FX monitoring and ordinary program/project effects are not interchangeable — turn DIRECT off when you need the normal FX-return routing.
Turn DIRECT off
Return to RECORD and set Monitor to ON for RECORD-only monitoring, or OFF to mute input monitoring. Unlike CHOP, DIRECT does not switch off when you leave its page. The DIRECT choice lasts for the session only: select it again after a power cycle.
Avoid feedback and clipping. Start with low input and output levels. Never route an output carrying the monitored signal back into the same input. Lowering Master level cannot undo clipping that already happened at the input or inside an effect.
Quick reference
| Where | Control | Result |
|---|---|---|
| SAMPLE › REGION | SHIFT + F1 | Toggle CHOP. While CHOP is on, F1 is visible without SHIFT. |
| CHOP:ON | Assigned pad | Select and restart its Region. |
| CHOP:ON, sample playing | Next unassigned pad | Create a new Region at the playback position. |
| CHOP footer | F4 CHOP TO | Open automatic attack-detection settings. |
| CHOP footer | F5 ADD | Split at the edited Region END position. |
| CHOP footer | F6 DEL | Merge the selected Region into the previous one. |
| SLICE SAMPLE | Create new program: YES + Non-Destructive: YES | Create a Region-linked program without separate audio slices. |
| PROGRAM pages | SHIFT + F6 | Cycle the shared Edit mode: ONE / ALL / ADD. |
| RECORD | Monitor: DIRECT | Keep the external input and RECORD Q-FX audible after leaving RECORD. |
| RECORD | Monitor: ON / OFF | Back to RECORD-only monitoring, or mute input monitoring. |
Saving and practical notes
- Back up first, and don't open old projects in 1.81. Keep projects from other OS versions on a separate backup and on the OS they were made with — re-saving them in 1.81 can damage them.
- Keep a copy before CHOP TO. CHOP TO replaces the current Region map; save a copy if you may want the earlier markers back.
- Save at STOP. Stop the sequencer before saving a whole project and before checking a fresh reload.
- No more than 96 Regions. CHOP does not create a 97th Region. Use another source or merge existing Regions when you reach the limit.
- Keep coordinates straight. START/END are per-channel sample positions with inclusive ends. Neighbouring Regions meet at previous END + 1.
- Markers are not slices. Editing the Region map does not rebuild a normal program; an NDS-linked program follows its source Regions.
Troubleshooting
The normal PROGRAM pad is silent, but CHOP preview works
Check MIDI › ROUTING › Drum pad. A pad routed only to an external MIDI OUT may not play the internal MAIN program. CHOP preview is a separate, page-local path.
A pad does not make a new cut
An assigned Region pad selects and restarts its existing Region. Use the next unassigned Region pad while the sample is actually playing. Also check the 96-Region limit and that the right source is selected.
Changing Edit mode seems to do nothing
ONE / ALL / ADD only changes how the following parameter edits are applied. No level, pitch or other value changes until you edit that parameter.
The external input stops when I leave RECORD
Go back to RECORD and check that Monitor says DIRECT, not ON. Check the selected Input Source, the source level and GLOBAL Master level. DIRECT does not need a pad press; if the input is also silent in RECORD, check the source and cables first.
The LCD images are unmodified emulator captures of the interfaces used by OS 1.81; the RECORD images come from the retained v31 DIRECT implementation. Demo names and sample lengths are illustrative. They are not photographs of a physical MPC, nor a guarantee for every hardware, audio or project-loading case. This is an independent guide, not an official Akai manual.
Tell me how 1.81 works for you
This is a beta, and I can't test everything myself — my MPC4000 has no analog outputs or ADAT boards. Any feedback helps: bugs, anything that behaves differently from the stock OS, results with expansion boards.
Missing something on your MPC4000? Send me your ideas for new features — the next version may include them.